
This post comes from my own experiments with Kubernetes, as well as bits and pieces picked up along the way. I once did get asked to look into Kubernetes seriously at my previous job, but realised I would have been out of my depth and nobody else in the company would have known how to manage a cluster, so that idea was scrapped. I continued to play around in my spare time, and for a while was running a few of my personal services on a k3s cluster. I still am out of my depth in some areas, but the things I learned by flailing around will be useful to others.
What is Kubernetes, actually?
It’s many things.
Most relevant to a developer, it’s an overly complicated way of running containers. This overcomplication largely comes from the fact that Kubernetes’ ideas are based on Borg, Google’s internal tool for managing compute workloads, and anything at Google is overcomplicated by design. It’s also a natural consequence of the way that Kubernetes approaches workloads, and the nature of horizontal scaling itself.
For operations teams, it’s a standard way to configure across cloud providers, while also being able to run something similar on-premise for experimentation and testing. It’s also extremely extensible, with the ability for external services to integrate within your cluster to automate and reduce the complexity of certain tasks.
For anyone else, it’s a bunch of very expensive buzzwords.
There is no single canonical “Kubernetes” to download; instead there are multiple distributions that wrap it up in slightly different ways. Each major cloud provider has their own distribution (which they hold very closely), but there are others like kubeadm (which is now shipped with Docker Desktop, making it the most accessible distribution for playing around), minikube (which runs in a VM), or k3s (my personal favourite. Is it weird I have a favourite Kubernetes distribution? Don’t answer that please. It’s good though; batteries included, and pretty easy to set up with k3sup).
The anatomy of a cluster
The basic components
The basic deployable unit of work is the Pod, which can contain one-to-many containers. It might seem odd at first glace that the basic unit of work is a pod and not a container. It still seems weird with later glances too, but there is at least a valid reason for it. These other containers might handle things like logging, internal TLS, routing, etc.; things that aren’t really the concern of the application container but are still inseparable from it. All containers in a pod will be on the same worker node, but replicas of a pod may exist on different nodes. Each pod is assigned an internal IP address within the cluster, but you usually don’t need to worry about those.
There are a few scenarios where you would want multiple containers in the same pod. For instance, you could have a web server and a second container that automatically renews HTTPS certificates, writing them on a filesystem mount shared by both containers in the pod.
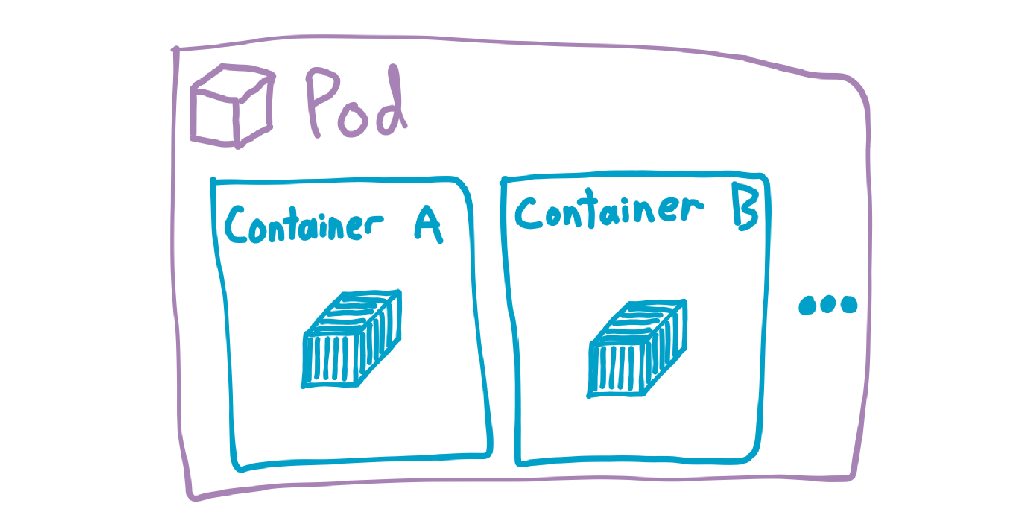
Since all containers in a pod are considered as part of a single unit, if any one of them fails then the pod is stopped and thrown away.
You can also have one-off tasks, which are represented by Jobs. Jobs are pretty much just like pods. You might use one to set up database schema or something like that.
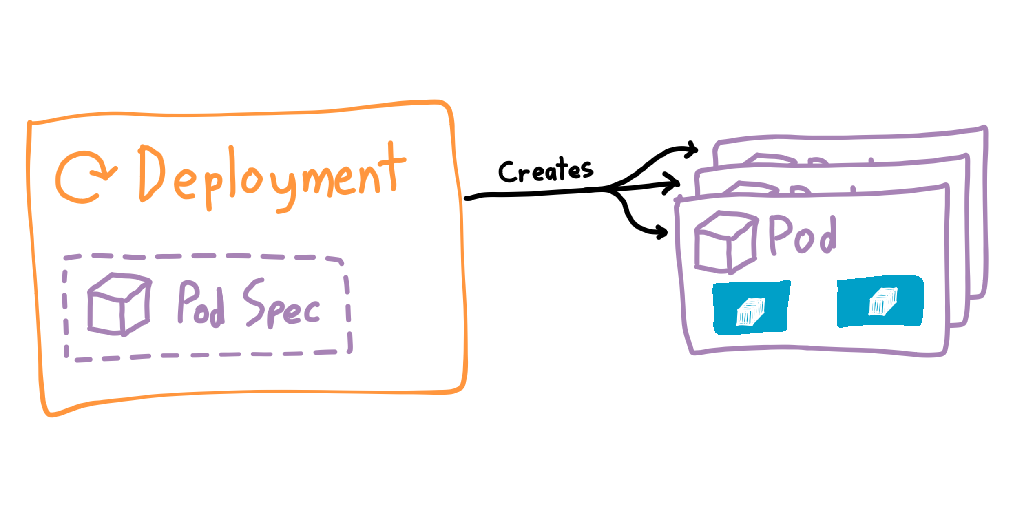
You usually won’t be creating a pod directly, since pods are ephemeral and can technically be removed by the control plane at any time. Most of the time you’ll use a Deployment, which manages the bringing up and tearing down of pods. Deployments contain a template of the pods it will be creating, which is how it knows what to build. Deployments also allow you to specify a number of replicas and the rollout strategy, making it extremely easy to scale horizontally (and blow out your cloud bill). If a pod is deleted or is stopped for whatever reason, then its deployment will try to spin a new one up.
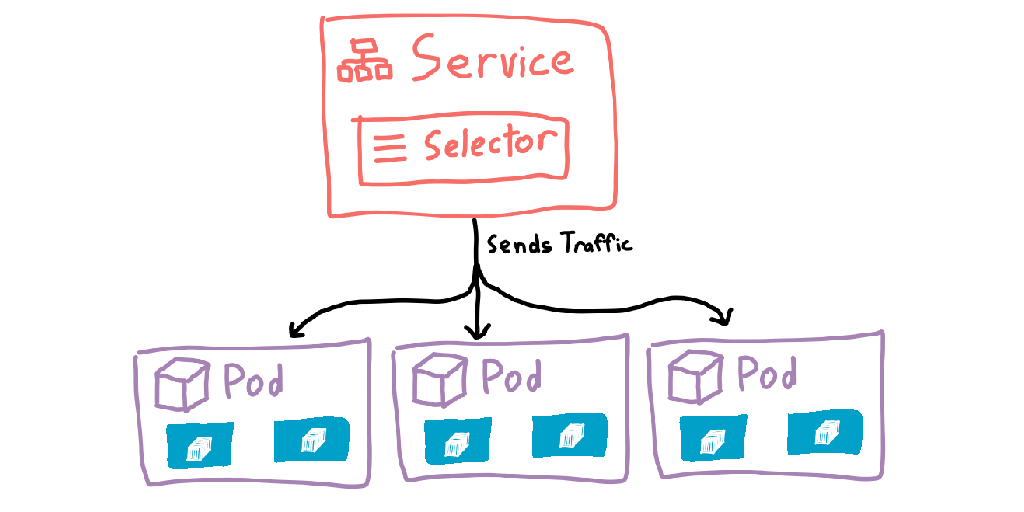
There’s now a new problem: thanks to the deployment potentially creating many pods, we no longer have a single place to route incoming traffic. To solve this, Kubernetes introduces another object: the Service. Services are a more permanent object that has knowledge of which pods are alive, and can route traffic to them. Services are also given internal DNS records within the cluster (<service>.<namespace>.svc.cluster.local), allowing you to send traffic by name and letting the cluster get the packets to the correct pods.
Kubernetes makes heavy use of DNS search domains, so you usually don’t need to specify the full name. For services within the same namespace you can just use <service>, or <service>.<namespace> for something in another namespace. The equivalent line in a pod’s /etc/resolv.conf would be:
search <namespace>.svc.cluster.local svc.cluster.local cluster.local
Services can use different matching rules to select the pods it can forward traffic to. The most common way is to add labels to the pods, then use those same labels in the service. An advantage of have an extra resource type is rather than just being able to point directly to a deployment, you can route traffic to pods created by multiple different deployments. I haven’t needed to do this myself, but I’m sure someone out there probably has needed this.
This stack of pod → deployment → service forms the core of any cluster, and is most of what a developer would need to know about Kubernetes. If you don’t intend to deal with Kubernetes yourself, you can safely stop reading here — the rest of this post adds in more concepts that are important if you’re running a cluster, but less important if you’re just trying to get your head around what this Kubernetes thing is.
Namespaces
Putting all of your applications in the same area isn’t much better than running them all on a single machine, but deploying a new cluster for every single application would be extremely wasteful. To solve this, Kubernetes has Namespaces. How you break things up into namespaces is really up to you, though you might do it based on project or by team/department in an organisation. You can create as many or as few namespaces as you like. There is one special namespace, kube-system, which is a common place for anything related to the running of the cluster.
Configuration and volumes
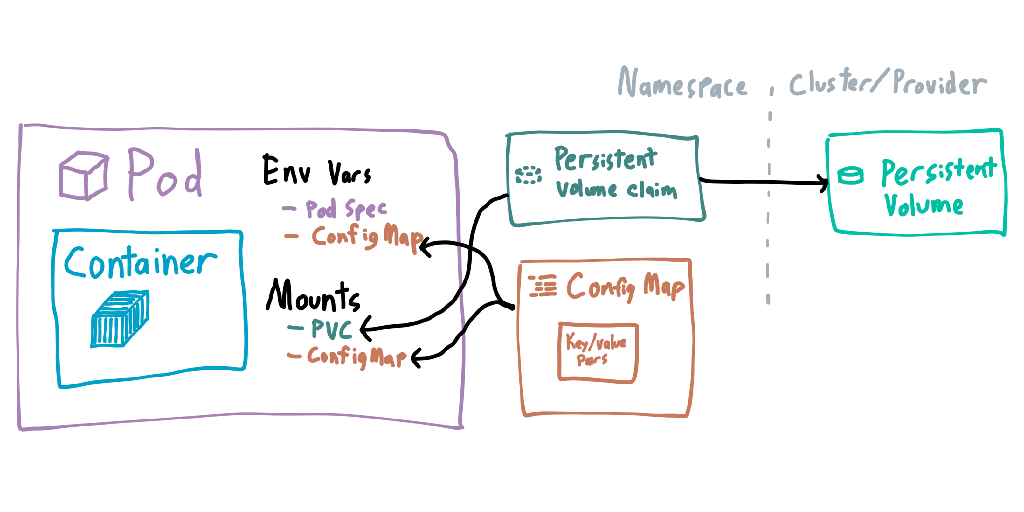
Configuration can be given to containers inside pods through ConfigMaps and Secrets. They’re mostly the same thing, but secrets are write-only when managing them and encrypted at rest. Values in both of them can be given to pods as environment variables or mounted as files within the container. Changes to these are not applied until the pod is deleted and re-created.
Filesystem mounts are predominantly done through PersistentVolumes and PersistentVolumeClaims. Volumes are at the cluster level, and usually represent the actual storage backing the mount (which can differ depending on cloud provider). A single volume can have multiple claims, such as a single RAID array having multiple services reading from different areas. Claims usually can’t overlap, but in some circumstances you can have read-only claims reading from the same location.
When declaring mounts, it may seem like you have to declare the mount twice. The first declaration is allowing the pod to use the volume, whereas the second declaration is for each individual pod. This allows you to claim a single volume for a pod, but split or share it however you need within the pod.
More networking
NetworkPolicies are used to restrict which pods are able to talk to each other, like a firewall. Both allow- and deny-lists can be given, dependent on need.
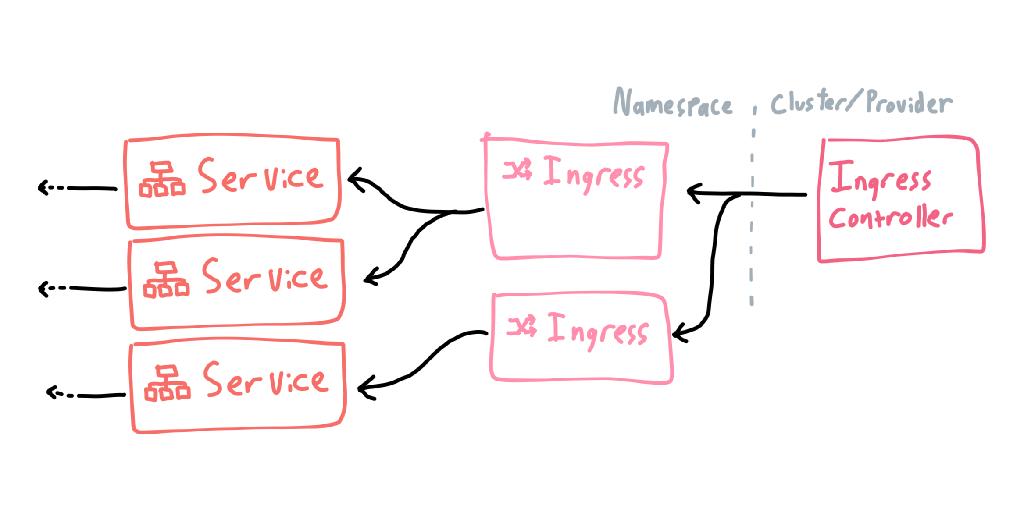
External networking is split into two halves: an IngressController, which is usually some form of proxy and is defined at the cluster level, and many Ingresses, which are rules that route traffic to services (I don’t know why they didn’t call them “IngressRules”, it would have saved me much confusion).
Nodes
So far I’ve been focusing on workloads (and the other objects required to expose those workloads externally), and less on how the cluster side of Kubernetes works. Kubernetes needs somewhere to actually run workloads, and those are the Nodes. Each machine connected to the cluster has a corresponding node object in the cluster, which the node controller uses to check resource loads and whether the machine is available at all.
New nodes are added to the cluster by telling the node where it can find the API server (usually the same location you point kubectl to in your ~/.kube/config). It will then connect, create the Node object in the cluster, and from then on the cluster will connect back to the node to tell it what to do.
Nodes can be given taints, which are used to prevent workloads from running on them unless the pods have a matching toleration. This could be used to, say, ensure Windows containers run on a Windows host, while Linux containers run everywhere else in a single cluster.
A cluster (finally getting to a definition for that word) is a collection of nodes that run containers. These nodes may exist across different datacentres or physical locations, and are all networked together so workloads can communicate as if they were on the same machine.
The two planes of existence
If a cluster is divided vertically into the nodes that run the workloads, then it is also divided horizontally into two planes. These are logical divides that separate processes that manage the cluster from end-user code.

The control plane
The control plane is where anything related to cluster management lives, and is usually managed by the distribution of Kubernetes you are using. Cloud providers will often host the control plane separately but it can also exist on the same machines as the worker nodes, just as a different process.
The control plane will contain an instance of the kube-apiserver (which is what the kubectl command actually talks to), the kube-scheduler (which is in charge of allocating work to the nodes), and many controllers that monitor and change states within the cluster (usually bundled as a single kube-controller-manager component). Cloud providers may also include a cloud controller manager for any integration with the rest of their offerings. In addition, each worker node will contain a kublet (which starts containers when told by the controller and scheduler) and kube-proxy (which interacts with the node’s network interfaces).
The control plane can be augmented with extensions, which can run as pods within the cluster or as external processes on the host machines. It depends on what those extensions need. Extensions allow the creation of other types of objects, which are usually added to help with the management of a cluster. A common example is Cert Manager, which can automate the deployment of HTTPS certificates.
The data plane
The data plane is where anything you create lives. Internally, this is just a bunch of object definitions; they don’t mean anything until processed by the controllers in the controller manager. Then the controllers will tell the scheduler to tell the nodes’ kubelets to create containers with the right configuration. To give a more concrete example of this, I’ve made up a basic scenario of what a cluster might do when a container has failed:
-
The container in a fails, leading to the pod failing. The cluster is no longer in the desired state.
-
The deployment controller notices, and checks the deployment that created the pod.
-
The deployment needs a new pod to be created, so a new pod is created.
-
The scheduler finds a node for that pod to run on.
-
The kubelet on that node spins up the necessary containers.
-
The cluster is in the desired state again.
Unless you’re on the team managing the cluster, the data plane is really the only part you care about.
Where to from here?
If you’re a developer just wanting to play around with containers and aren’t serious about the cloud, just use Docker Compose files. It’ll be much simpler and easy to maintain.
If you do want to go down the path of Kubernetes, then spin up a local cluster and play around. For me, I learned most by writing and applying YAML files and getting things wrong.